Communicating with the public

Communicating with the public or a non-expert audience can be a difficult task to master. Problems can arise if the communicator is unaware of who the audience is and how best to communicate with them.

You should spend some time considering who your audience is, what they may know, and why they’re engaging with your communication.

For non-expert audiences, the level of scientific knowledge can vary considerably. Although we often group all non-experts into a single group (the public), in reality there are many publics, all with a variety of knowledge, experiences, and opinions. Therefore, rather than simply “dumbing down” a topic, you will need to spend time on planning your communication activity to ensure you engage with your audience and achieve your purpose.

The planning process for communicating with a non-expert audience should be no different to the planning process used for communicating with your peers or an expert audience. However, you may find that context plays a larger role (particularly for controversial topics) and you may have more flexibility when choosing a genre.

Recommended resource

Talking Science: An Introduction to Science Communication

In all cases, you should use the communication template to define the various parts of the communication task to ensure you have considered all aspects of the task.


Tips for communicating with the public

Storytelling for science

One of the greatest benefits of communicating with non-expert audiences is the opportunity to move away from the strict conventions of the scientific article to less formal and, if appropriate, more entertaining forms of communication.

Storytelling can captivate audiences.

Unlike a formal scientific article or presentation, storytelling allows you to connect with your audience through a variety of storytelling techniques, using emotion, metaphors, anecdotes, and images to incite wonder and interest in science.

The following Radiolab podcast is a great example of telling a science story (begin at 2:25).

While there are many things to consider when crafting a scientific story, the following video will give you an overview of why storytelling can be so influential.

Consider how you can use storytelling to communicate your scientific message.

Jargon and technical terms

Reducing or eliminating the use of jargon and technical terms is a great way to improve your communication with a non-expert audience. By avoiding technical terms you will be forced to consider ways to provide scientific information in a way that can be understood by a wide variety of audiences.

If you do need to use technical terms, you should ensure you provide clear explanations or use well-designed diagrams or photos to help your audience to understand the key concepts.
Example 1
An example of jargon is the term “communicable disease”. This term is often used by scientists and health professionals when discussing immunisation but it would be rarely used by the public. The terms infectious disease or contagious disease (although they have distinct definitions) would be more appropriate terms for a non-expert audience.

Example 2
The term “herd immunity” is often used when discussing immunisation against disease. Despite being a reasonably common term, a non-expert audience may not fully understand what it means. In this case a diagram that illustrates the spread of a disease with and without herd immunity would help to explain a technical term that is fundamental to many arguments involving immunisation.

Assessing the context

It is essential to consider the context around any communication with a non-expert audience. Failing to consider context could result in your communication activity failing to achieve its purpose. This is particularly important for controversial topics or topics that generate strong emotional responses (e.g. vaccination).

Example
You have organised a public talk about your research on a new delivery method for vaccines. Your purpose is predominantly to inform members of the public about your innovative research.

One week before you are due to give your talk there is an incident involving a flu vaccine program that results in the hospitalisation of dozens of children. The topic of the safety of vaccines is now a very hot topic and very much in the public eye.

Considering this context, you may want to modify your talk to include up-to-date information on the incident and discuss the possible reasons behind the hospitalisation.

You may need to answer some difficult questions about your research that you may not have initially expected. Is your new delivery method safe? Will your vaccine delivery method lead to children in hospital beds?

Context must be considered to gain a better understanding of what your audience may be thinking and how they may engage with your communication activity.

Choosing the right genre

Different genres can attract different audiences, so you need to think carefully about which type of communication activity will engage your target audience and how it should be structured to achieve your purpose.

Popular genres for general audiences:

  • Blogs
  • Vlogs
  • Public talks
  • Podcasts
  • News articles
  • Magazine articles
  • Documentaries
  • Social media

Regardless of the genre you choose, you should attempt to customise the genre for different situations or different audiences.

For example, a public talk on scientific research doesn’t have to be a scientist talking for 50 minutes and answering questions for 10 minutes. Instead, more time could be spent interacting with the audience and answering questions, other experts could participate in a panel discussion, or the audience could interact with scientific models or displays.

Example
Imagine that you want to try to address some of the misinformation around immunisation in Australia.

You decide to write a blog about immunisation that targets new parents wanting more information. Some parents may already have some doubts or questions about possible side effects.

Rather than blogging about all the latest immunisation research and what it means, you could bust some of the myths around immunisation, use simple infographics or videos to explain how it works, explain some the benefits of immunisation, or have a Q & A section where parents can ask specific questions.

Alternatively, you could run public information sessions on immunisation. There is always a temptation at public meetings to have experts give a presentation that tries to persuade an audience by using raw facts. However, non-expert audiences may find this lecturing style of communication boring, difficult to understand, or sometimes condescending.

Non-expert audiences will often have questions before any information is presented. Therefore, you could limit the use of PowerPoint presentations and instead provide plenty of time for the audience to interact with the experts and ask questions. To balance detailed scientific information, you could have a historian give a short talk about what life was like before widespread immunisation.
Writing a blog

Define your topic and audience

The blog genre allows you to write about almost anything for a range of audiences; however, you should define your topic, audience, and style early on.

Your blog posts should have a common theme and your content should be set at an appropriate level for your audience. Blog posts can focus on very specific topics (e.g. a blog about infectious diseases) or cover a wide range of topics (e.g. a blog about health).

Some blogs will have a news format whereas others may provide in-depth analyses or simply talk about the author’s life as a scientist. The options are endless.

Blog examples

Dr. Karl – Great moments in Science
Dr. Cameron Webb – Mosquito & research management

Breaking up the content

Blogs often have a variety of content including opinions, reviews, video, audio, images, and links. You should aim to provide some variety for your audience.

Blogs posts that include a large amount of text will usually break up the content into distinct sections with headings and use short paragraphs.

Sometimes, the paragraphs are only one sentence long.

This allows an audience to scan through the text, choosing to read sections that interest them.

Bullet points, lists, quotes, and occasional bold highlights will also break up a lengthy blog post and improve readability.

Free blog websites
WordPress.com
Blogger.com
Wix.com
Weebly.com

Planning and creating a vlog
A vlog takes the idea of a blog and enhances it with video. Vlogs can increase the level of interaction with your audience by combining a voiceover with images, physical models, animations and footage.Before you begin planning your vlog, you should define your audience. Understanding the level of knowledge of your audience will help guide you when writing your content and considering what visuals will improve communication with your audience.

Assessment items that require a vlog will vary in their requirements. Be sure to check your assessment criteria for specific details or talk to your lecturer.

A vlog is not just a recorded presentation. Vlogs are generally shorter, sharper, and allow for a bit more creativity than a traditional scientific presentation.

For assessment items that require a recorded PowerPoint presentation (or similar), refer to the presentation module.

Writing a vlog script

Writing a script is a great way to plan the content for a vlog; it allows you to easily check that you’ve addressed all aspects of the task and ensure the video is an appropriate length.

At university, video assignments may require you to provide an explanation of results, summarise a scientific article, or discuss a particular substance, process, or species. Regardless of the topic, in most cases your video should have an introduction, body, and conclusion.

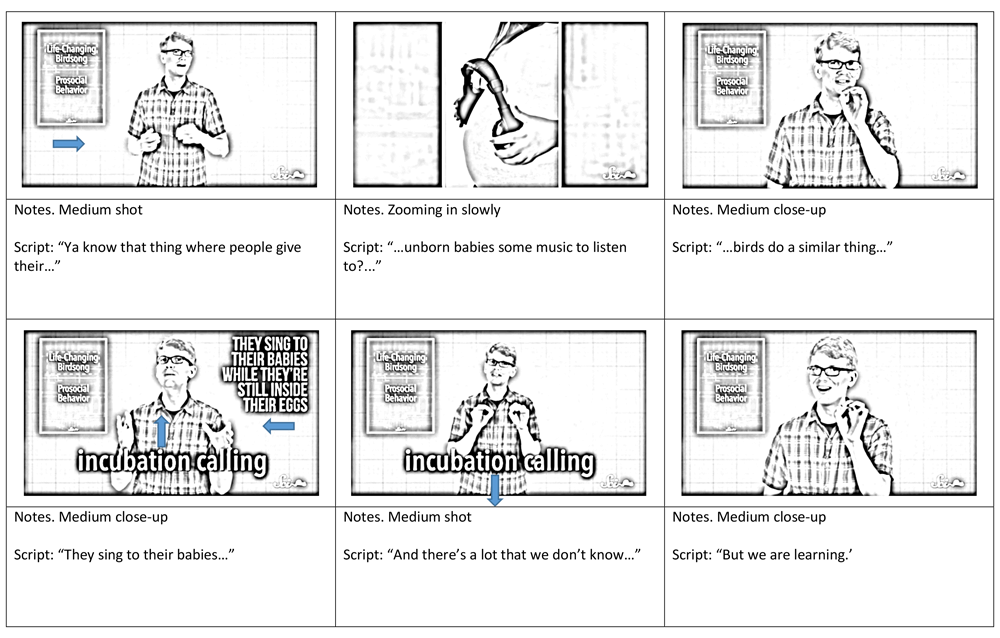
Before reading further, watch the first 2 minutes of the following SciShow video by Hank Green. The video focuses on a scientific article about incubation calling by birds. Pay attention to how Hank summarises the article and provides simple explanations for specific concepts.

Introduction

Your introduction should grab your audience’s attention, provide some background information, and lead them into the main content in the body section. Vlogs usually allow for a bit more creativity than a PowerPoint presentation or a written task, so don’t be afraid to try something different in your introduction to engage your audience.

In the SciShow example, Hank provides an analogy of a human mother playing music to her unborn child. This analogy helps to prime the audience for the following scenario involving bird incubation calls. Hank then introduces the topic of incubation calling.

Body

You can begin a script by writing down the key points that you need to include in the body of your video. Check your assignment criteria for details of any specific information that should be included. For example, if you were providing a summary of a scientific article, you may need to discuss each section of the article or simply mention the key findings.

Consider what visuals you will use in your video and make a note of when they should appear in the video. Often the visuals you choose will help you to develop different sections of your script.

Once you have an outline of the information you want to include in the body section, you can transform the information into sentences. See below for script tips.

In the SciShow example, Hank provides details of the experimental methods and results. The explanations are accompanied by text, images, and a simple animation. Hank continues to provide further explanation for the behaviours and discusses possible benefits of the incubation calling.

Conclusion

The conclusion gives you the opportunity to discuss the ‘so what?’ question (i.e. why should your audience care?). For science vlogs, the conclusion can also give consideration to future research possibilities or limitations of research findings.

Hank summarises the benefits of a small body mass for Zebra finches and indicates that the mechanism linking incubation calling and body mass remains a mystery—this is the same as suggesting further research is required.

Refining a script

Once you have a rough draft, record yourself reading through the script. As a rough guide, 150 words takes about 1 min to read aloud. It is essential that you speak clearly and use pauses for emphasis—don’t rush your vlog to fit within the time limit!

If you are over time, remove any sentences that are not essential and refine lengthy sentences.

If you are under time, consider where you can add more detail to individual sentences.

Pay attention to any parts of your script that, when read aloud, don’t sound quite right. You may want to rearrange a sentence or modify particularly words to improve cohesion.

Storyboarding

Storyboarding is useful if you have a variety of footage or images to display. The process allows you to visualise the different sections of your video and rearrange parts if necessary.

Once you have a script, use it to map out what will appear on the screen. You don’t need to be able to draw. Simply use rough sketches to illustrate the major sections or shots of your video. If you’re on the screen, you can draw a stick figure. If you’re displaying a graph, sketch a simple graph.

Download the storyboard template

More information on storyboarding: Creating simple storyboards

Tips for scripts

Write for the ear, not the eye

One of the problems with using a script is that when you read it out it just doesn’t sound natural. Try to make your sentences sound less formal by using short sentences and writing like you’re having a conversation with someone you know.

Use contractions

Using contractions (don’t, won’t, haven’t, isn’t etc.) in your script will make you appear more relaxed and conversational. If you haven’t used contractions, you should notice that when you read your script for the first time it will sound too formal for a general audience.

Emphasis

When reading a script or recalling a script from memory, you may forget to add emphasis to important words or syllables. This robotic, monotone style can be avoided by underlining or highlighting words and syllables that require more emphasis. When you read through the script, the underlined or highlighted words will help you to remember to use emphasis.

Use the script as a guide

Probably the best way to avoid sounding unnatural when using a script is to just use it as a guide. This method is particularly useful if you need to be on camera for most/all of your video. Read through your script a few times to get familiar with your content and then put the script aside. Don’t worry if you miss certain words or explain things in a slightly different way, as long as you cover all the essential parts.

Don’t try to do it in one take

Don’t worry if you can only remember small segments of your script—you can join all of your segments together during the editing process. Be careful that you use the same lighting and audio setup for each shot. You will notice in Hank Green’s video that he only says one or two sentences before a break. Some of these breaks are softened by cutting to other graphics or by using zoomed in shots.

Help with filming and editing

Filming

When filming a video you will need to consider the technical aspects (e.g. sound & lighting) and your presentation skills.

Technical information

The expectations for the technical aspects of your video may vary depending on the assignment criteria. However, for vlogs you should always make sure the audio is clear and the lighting allows your audience to see you.

The following tutorials include a range of useful tips for recording a video. The first two videos include details about filming with a tripod and microphone—don’t worry if you don’t have access to this equipment—just be mindful of sound quality and camera shake.

iPhone tutorial by Justin Brown
Android tutorial by Justin Brown
General filming information by ABC Splash

Filming a vlog is a difficult task that generally requires regular practice to perfect. The following video provides some tips to help you improve your skills when talking to a camera.

Presenting skills tutorial by Justin Brown

Video file sizes

Large video files can cause problems when trying to submit university assignments online. For best results, try to keep your video file size 25 – 75 megabytes/minute. It is recommended that you use a university computer for maximum upload speeds.

Reducing file size

The best way to reduce file size is to record your video using a low quality setting. If possible, choose to record your video using the VGA setting rather than HD. If you’ve recorded your video and the file is too large, you will need to compress the video file.

VLC Media player

VLC is a free video player for Windows and Mac OS that can be used to convert and compress your video files. More information

Software export settings

Video editing software will generally have an export function that allows you to save your video at a reduced quality and smaller file size. Search Google for information on specific software.

Editing

Editing a vlog should be a fairly simple process. Once you’ve recorded your footage, it’s simply a matter of trimming and joining clips, and adding any necessary images, text, or sound. Video editing apps for mobile devices will generally include all the necessary features for editing a vlog. So, it’s possible to streamline the whole vlog process by completing the filming AND editing on your mobile device.

Editing apps and programs

For iPhones/iPads

iMovie (free for recently purchased devices – more info)
Adobe Premiere Clip (free)

For Android devices

Adobe Premiere Clip (free)
PowerDirector (free, but includes watermark)
Kinemaster (free, but includes watermark)

For Macs

iMovie (free for recently purchased devices)
DaVinci Resolve (free)

For Windows

DaVinci Resolve (free)
Windows Photo and Movie Editor (free)

Editing tutorials

Justin Brown’s YouTube channel has a great variety of general filming and editing tips.

Justin Brown’s Youtube Channel

Specific software tutorials

iMovie tutorial by Justin Brown
PowerDirector tutorial by Justin Brown
Kinemaster tutorial by Justin Brown
Adobe Premiere Clip tutorial by Adobe
DaVinci Resolve tutorial by Blackmagic
Windows Photo and Movie Editor tutorial

If you’re still struggling with the editing process, search on Google or YouTube for the solutions to specific problems.