An introduction to PowerPoint presentations
PowerPoint should be used as a visual aid
PowerPoint presentations should be used as a visual aid that helps your audience to understand and remember the key details of your presentation.
Your audience want to hear you speak. They want to hear you explain your ideas, present results, or tell a story.
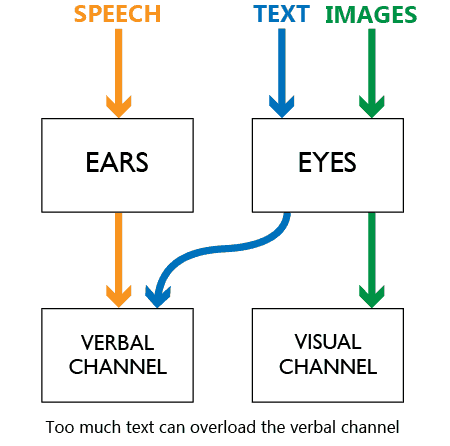
The human brain has a verbal and visual channel
When learning new material, there is a maximum amount of information that your brain can process at one time. We use visuals to help people to understand a concept. By using an image and talking about a concept, you are using both channels in the brain. Therefore, your audience will be more likely to understand and remember your message. However, many presenters mistakenly consider text on the screen to be visual information.
Text is not a visual aid
Text on the screen is processed by the verbal channel in your brain (think of the voice in your head when you’re reading). If you’re talking while people are reading your slides, your audience can be easily overwhelmed by too much information entering the verbal channel. A good PowerPoint presentation will use minimal text and instead concentrate on using speech and relevant visuals to communicate a message or explain a concept.
This module provides the information you need to plan, design, and construct a visually appealing science presentations that won’t overwhelm your audience.
1. Have a clear purpose
Defining the purpose of your talk will help you to focus when you’re designing the content for your slides and when you’re giving your presentation.
Are you trying to explain, instruct, persuade, or entertain?
All effective communication needs a purpose.
At university the main purpose of many of your oral presentations will be to talk about research you have performed, using visuals to present your results and persuade the audience that your conclusions are valid.
2. Know your audience
While at university, your audience will often be your peers who have similar skills and knowledge. However, if you’re presenting information on a new topic, you need to ensure you present enough background information.
Thinking about your audience and considering how they may react to your talk will guide you when you consider what you are going to say in your presentation and how you will support your statements with visuals.
3. What are you going to say?
If you have determined your purpose and you know your audience, planning the content of your presentation will be much easier. Your talk should be comprised of only essential information that helps you to achieve your purpose.
The assertion-evidence approach
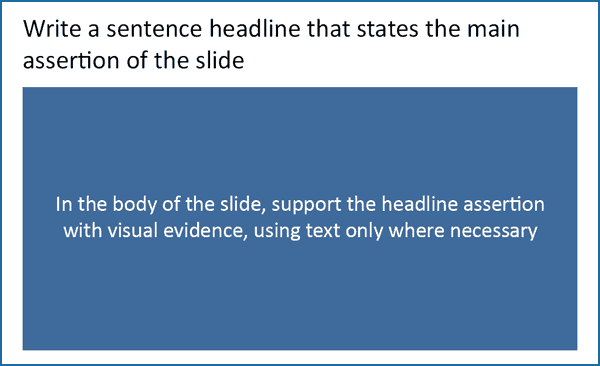
The assertion-evidence approach uses slide headlines to plan and present your presentation. Rather than using vague titles such as ‘introduction’ or ‘results’, the slide headlines will tell the audience exactly what the slide is about.
The headline is supported by a relevant images, graphs, diagrams, and limited amounts of text – not a list of bullet points or clip art. Your slide headlines will make up the main points of your presentation but it is up to you talk about the key message of each slide and provide more detail when necessary.
Planning template
Download the planning template
The ‘planning your presentation’ template will help you to structure your talk before creating your visual slides. The template’s 3-part structure can be used to create a range of presentations, from a brief project proposal to a more detailed conference talk.
The template provides space for you to write the headlines for each of your slides – one message per slide. Once you’ve entered in your headlines you can then transfer them to individual PowerPoint slides.
The template provides a column for a 5-10 minute talk and a 15-20 minute talk. For the longer talk, create 3 headlines that provide more information on each of the key points listed in the 5-10 minute column.


Design Guidelines
Begin by placing your presentation headlines on blank slides and add any relevant images or graphs that clearly support the assertion in the headline. Don’t use vague section headings such as “methods” or “results”.
For headlines:
- Use a sans serif font (E.g. Calibri, Arial)
- Font size 36-40
- Maximum 2 lines
You can include small amounts of other text on the slide, if necessary, but avoid using bullet points. Bullet points are a bit like a shopping list – just a group of individual items with no story connecting them.
Use colour to highlight important features or differences
- Don’t use PowerPoint templates & backgrounds with designs or gradients.
- Use a light background with dark text or dark background with light text.
Graphs should be designed specifically for your presentation
- Focus on the important data. Leave out any data that does not help you to communicate the key message.
- Make the graph the main feature – not a decoration.
- Place labels on the graph – don’t use legends that your audience must decipher.
- Highlight interesting features with arrows or circles.
- Explain what the graph means.
Images should support the headline assertion
- Don’t use clip art.
- Only use images that clearly support the headline assertion.
- Don’t use images to “add interest” to your presentation. If you’re not talking about the image, leave it out.
- Only use logos and institute information on the title and final slide.
Always double-check your slides for errors. If possible, have someone else look at your slides to check for errors.
An academic explains


Useful links
Creating effective slides: design, construction, and use in science
by Jean-luc Doumont
Watch Video Communicating Science to Non-scientists
by Jean-luc Doumont
Watch Video The assertion-evidence structure for PowerPoint slide design
by Robert Yale
Watch Video Designing effective scientific presentations
by Susan McConnell
Watch Video How to avoid death by PowerPoint
by David JP Phillips
Watch Video Make body language your superpower
by Stanford University
Watch Video