Creating your poster
1. Create your content
Define your message
The first step in poster design is planning what content you want to present, not planning what it will look like. The content you include should contribute towards communicating one key message – you don’t want to show all of your research on one poster. Trying to fit too much information will limit your poster’s effectiveness as a communication tool.
Start in MS Word (or equivalent word processor), and draft a summary of your research. Once you have a summary written, you can move on to expanding this and writing the sections of your poster.
Remember to include:
- Background information
- Methods
- Results
- Discussion/conclusions
Posters are all about visual communication, so you need to consider the images and graphics you can include to illustrate your key message.
2. Style
Draft your content
You should now know your key message, and have a summary with the background information, methods, results, and conclusions you want to include on the poster. Before expanding on these sections, remember that a poster is different to a research paper. The amount of text and the writing style is also going to be different.
Who is your audience?
Before writing text content for a poster, you should first consider your audience. Think about where you are presenting your work, and who you will be viewing your poster. In a research paper, your audience is typically researchers in your field. Complexity, detail, and specific terminology are expected. Your audience for a poster is usually broader. It is likely they will not have the same depth of understanding of your research as you do. Avoid using jargon specific to your work, and write for a more general audience. If you need to include some complex language, try to make it as clear as possible.
Write clearly and concisely
The style of the writing for a poster is different to a research paper; it needs to be concise and to the point. Your audience will disengage with your poster if it is filled with long, overly complex sentences. Only include what is essential for communicating your key message. The word limit for your poster, and each section expanded from your abstract, will depend on your content. In general, do not exceed 200 words for a paragraph and 800 words overall. Your poster will be more successful as a communication tool by keeping the content brief, ensuring the style is engaging, and the language accessible for your audience.
Consider how you can present your information so it is visually appealing. You can communicate your methods section with diagrams or flow-charts, rather than highly-detailed paragraphs.
Your results section should be the largest and the most visually appealing section of your poster.
There is no need to use text for results that you show graphically, but a bulleted list is an effective way of highlighting your major findings. Your audience will be more likely to engage with a poster that uses visual communication effectively, so it is worth spending some time on this.
3. Plan your layout
Sketch a layout
When you are happy with your content, and you have all your visual elements prepared, you can start thinking about what the poster will look like.
A good first step is to make a sketch of your poster layout on paper.
Consider the amount of text in each section when sketching the layout.
How much room will the title and graphics need?
How many images do you have, and where will you position them?
For this step, think about flow of information and how you want your audience to read the poster.
Start transferring to PowerPoint
Once you’re happy with your sketch, open up a blank PowerPoint presentation and start building your poster layout. Follow any specific guidelines you’ve been given by your lecturer.
- Resize the slide by using the page setup option in the design tab on the menu bar.
- Use boxes to block out sections of the page where your text and graphics sections will go, then add text boxes.
- Once you’ve got a clean layout, start importing the content and your figures to your PowerPoint slide.
Download Landscape PowerPoint Templates


Download Portrait PowerPoint Templates


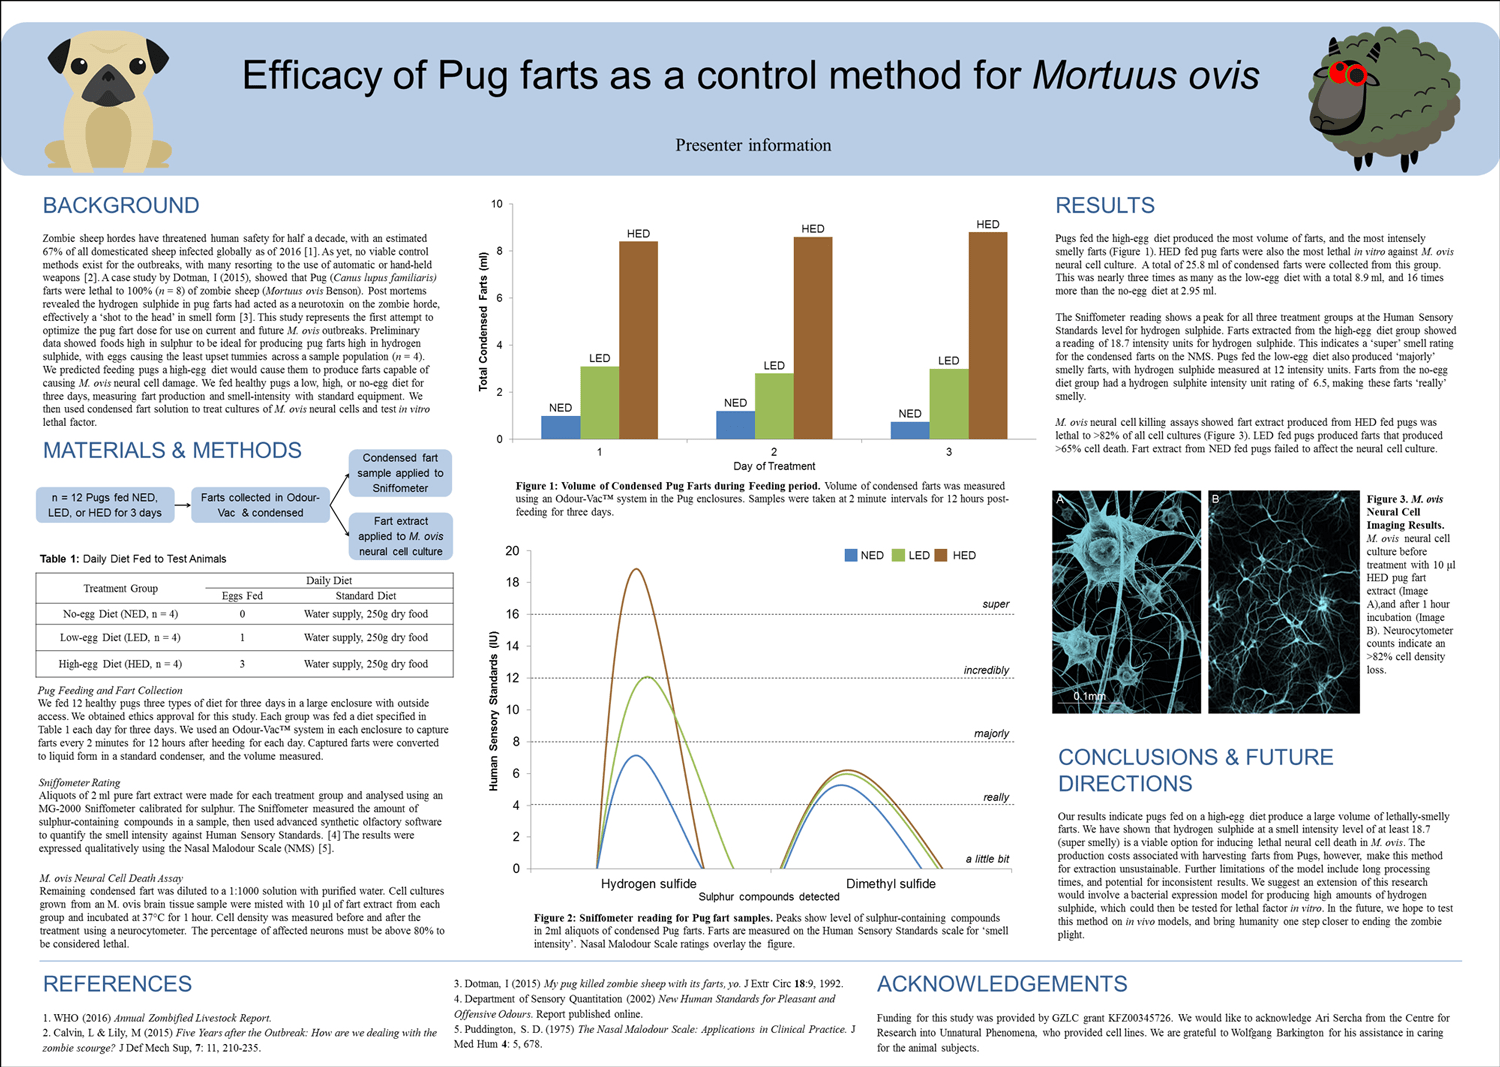
High quality poster
Good use of graphics and well-designed
Text content
There is minimal text, written clearly and concisely with little jargon. Only essential information is included.
Graphics content
Graphics take precedence over text and are clearly formatted to guide the viewer to the key message.
Aesthetics
The poster layout is clean and uses ample white space. The use of consistent and appropriate text formatting and pleasant colours make this poster easy to follow.
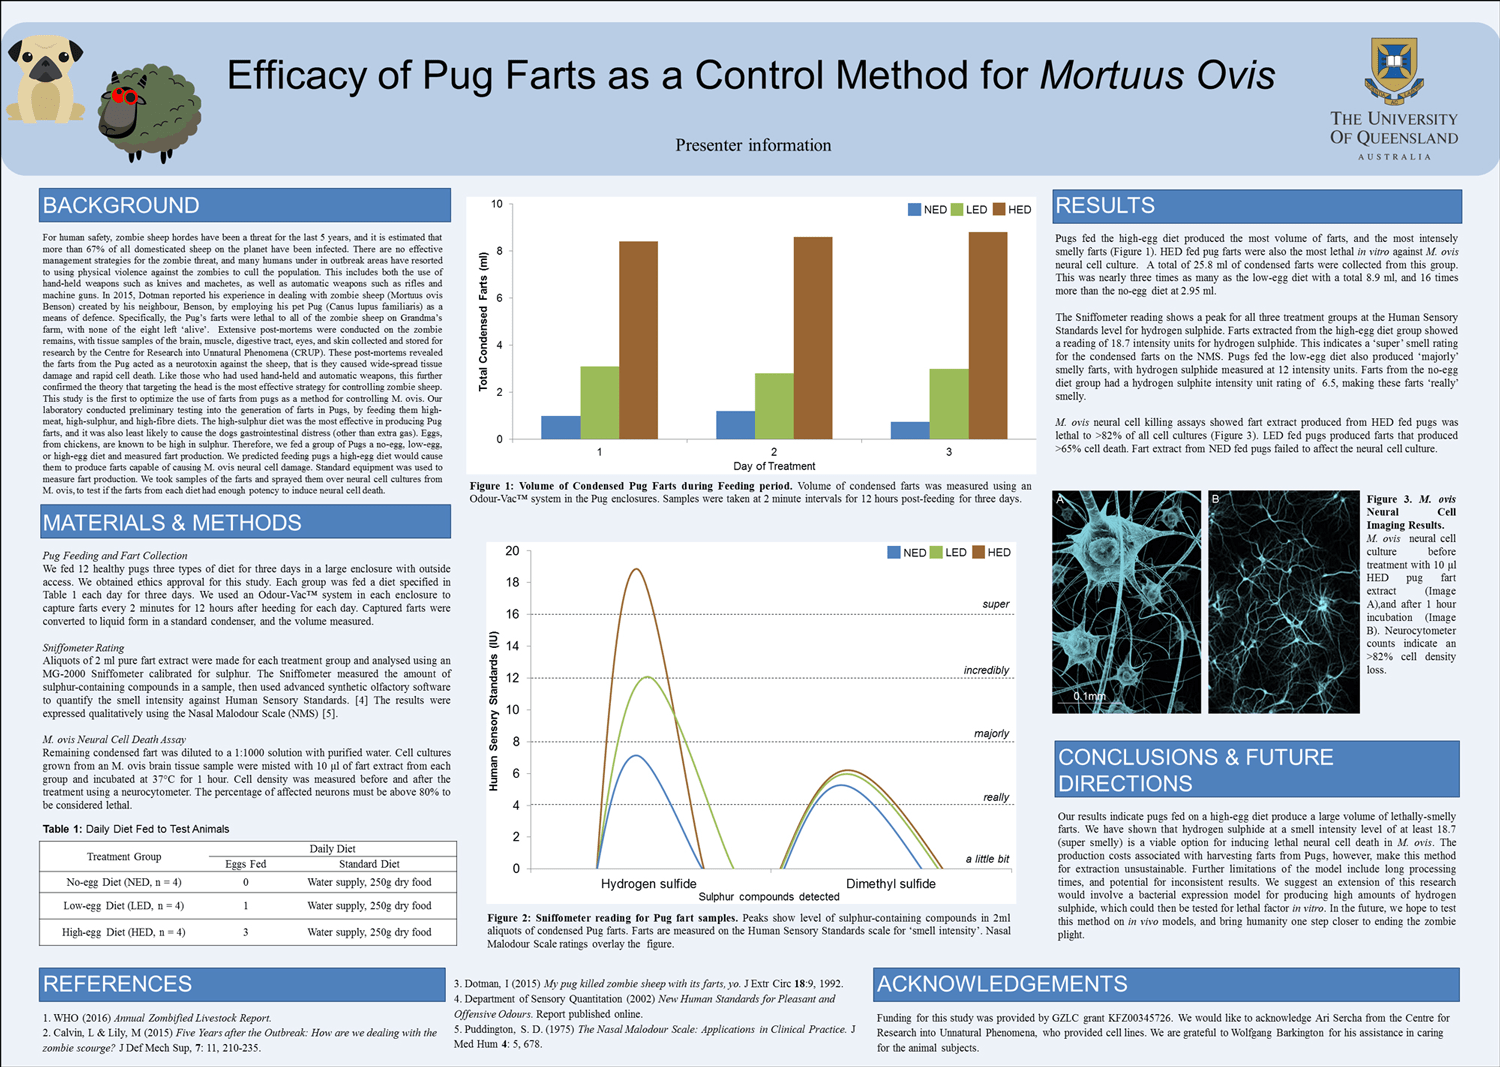
Good quality poster
Neatly presented but too much text
Text content
The text included is written concisely, though some duplicates the graphics content and includes too much detail.
Graphics content
The graphics are formatted clearly, though include some unnecessary information that gives text precedence in communicating the message.
Aesthetics
The poster is a little crowded, but clean.
Average quality poster
Excessive text and some formatting/colour issues
Text content
This poster includes too much text. Some sections include an excess of detail and are not written concisely. Text duplicates the graphics content.
Graphics content
Graphics are not used to communicate information other than results, and the figures are not formatted for ease of reading on a poster.
Aesthetics
Visual flow and clarity is reduced by use of colour and formatting. The contents of the poster are crowded.
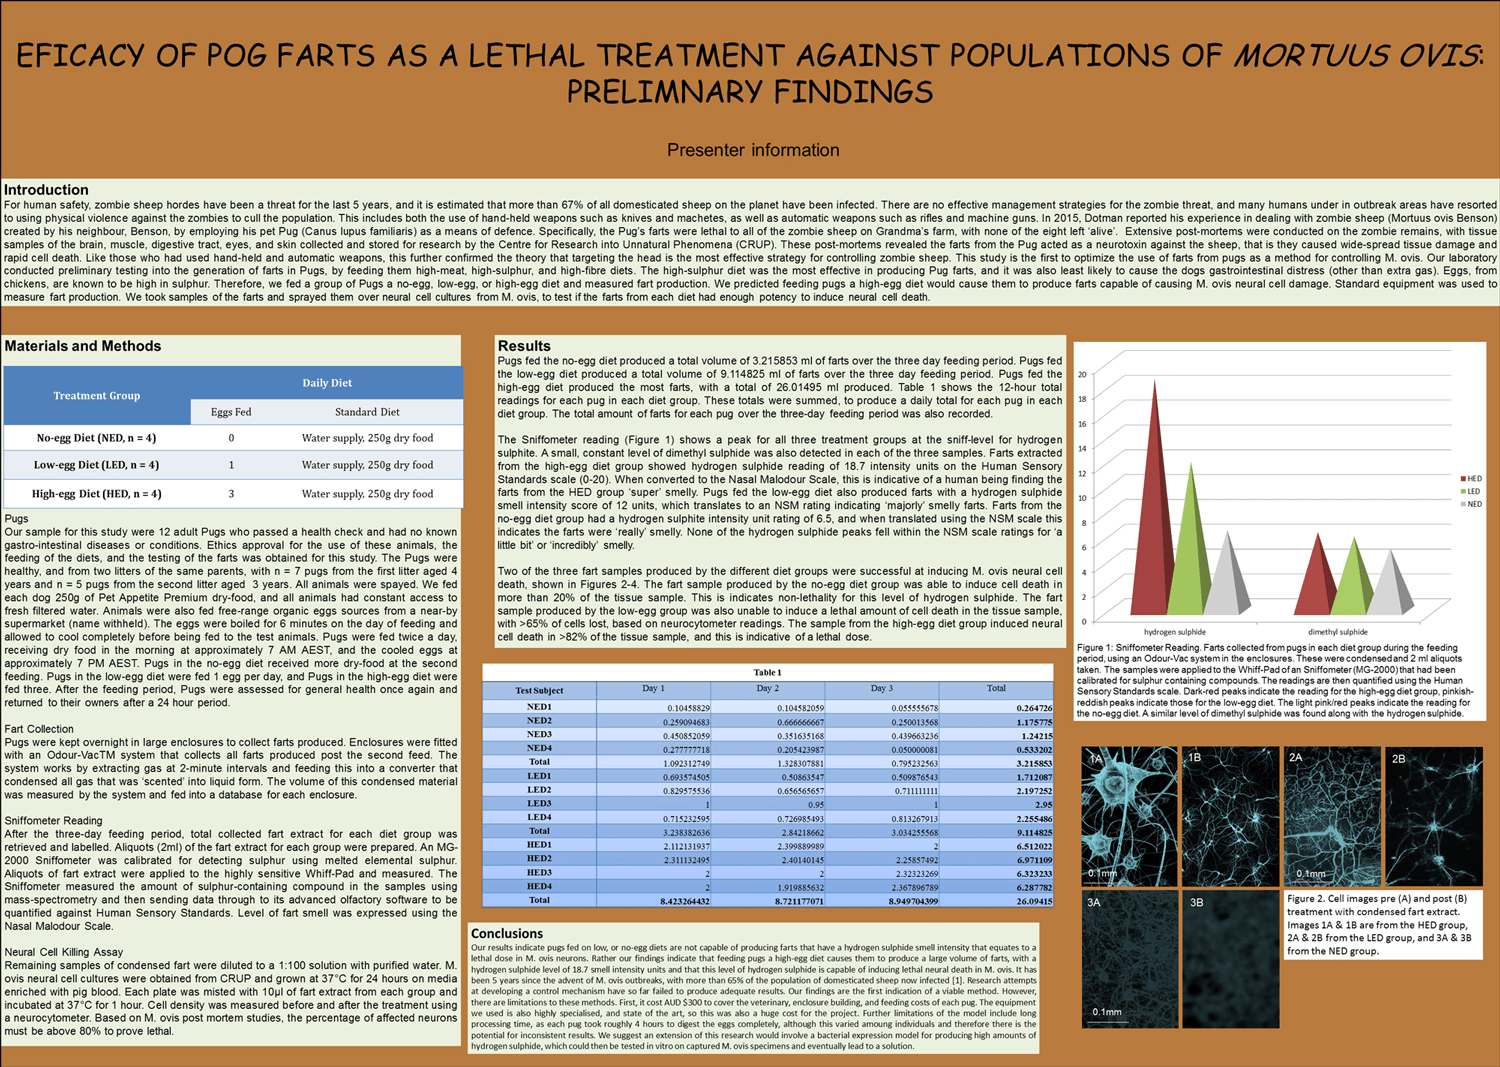
Poor quality poster
Text is overwhelming, graphics confusing, and colour not used effectively
Text content
The text is excessive and complex, heavy with jargon and errors. Essential information is missing.
Graphics content
Figures and tables are difficult to interpret, with poor formatting and excess detail that detract from the key message.
Aesthetics
No thought has been given to layout, colour choice, or text formatting, resulting in a poster that is difficult to read and unpleasant to look at.
Graphics
Any graphs, diagrams, or images that you use in your poster should be easy to read and understand from a distance of at least 1 metre.
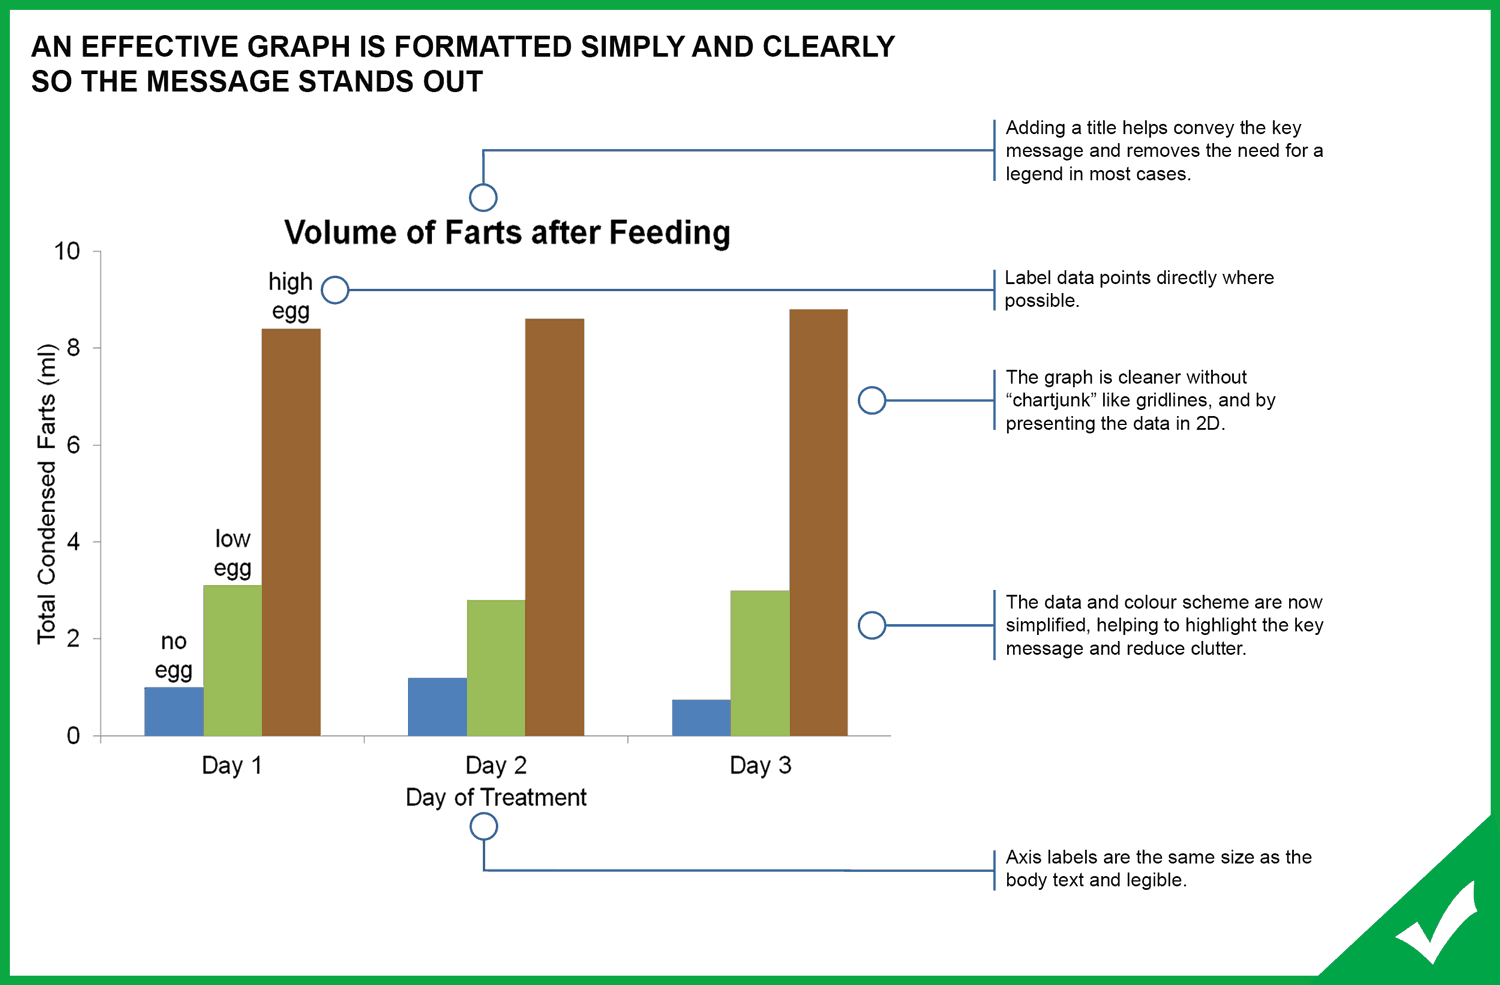
The graphics that you create for your poster should look different to those you would include in a report. Your graphics should be free from clutter, use colour to highlight important information, and only include information that supports your key messages.
View the examples below for more detailed information.

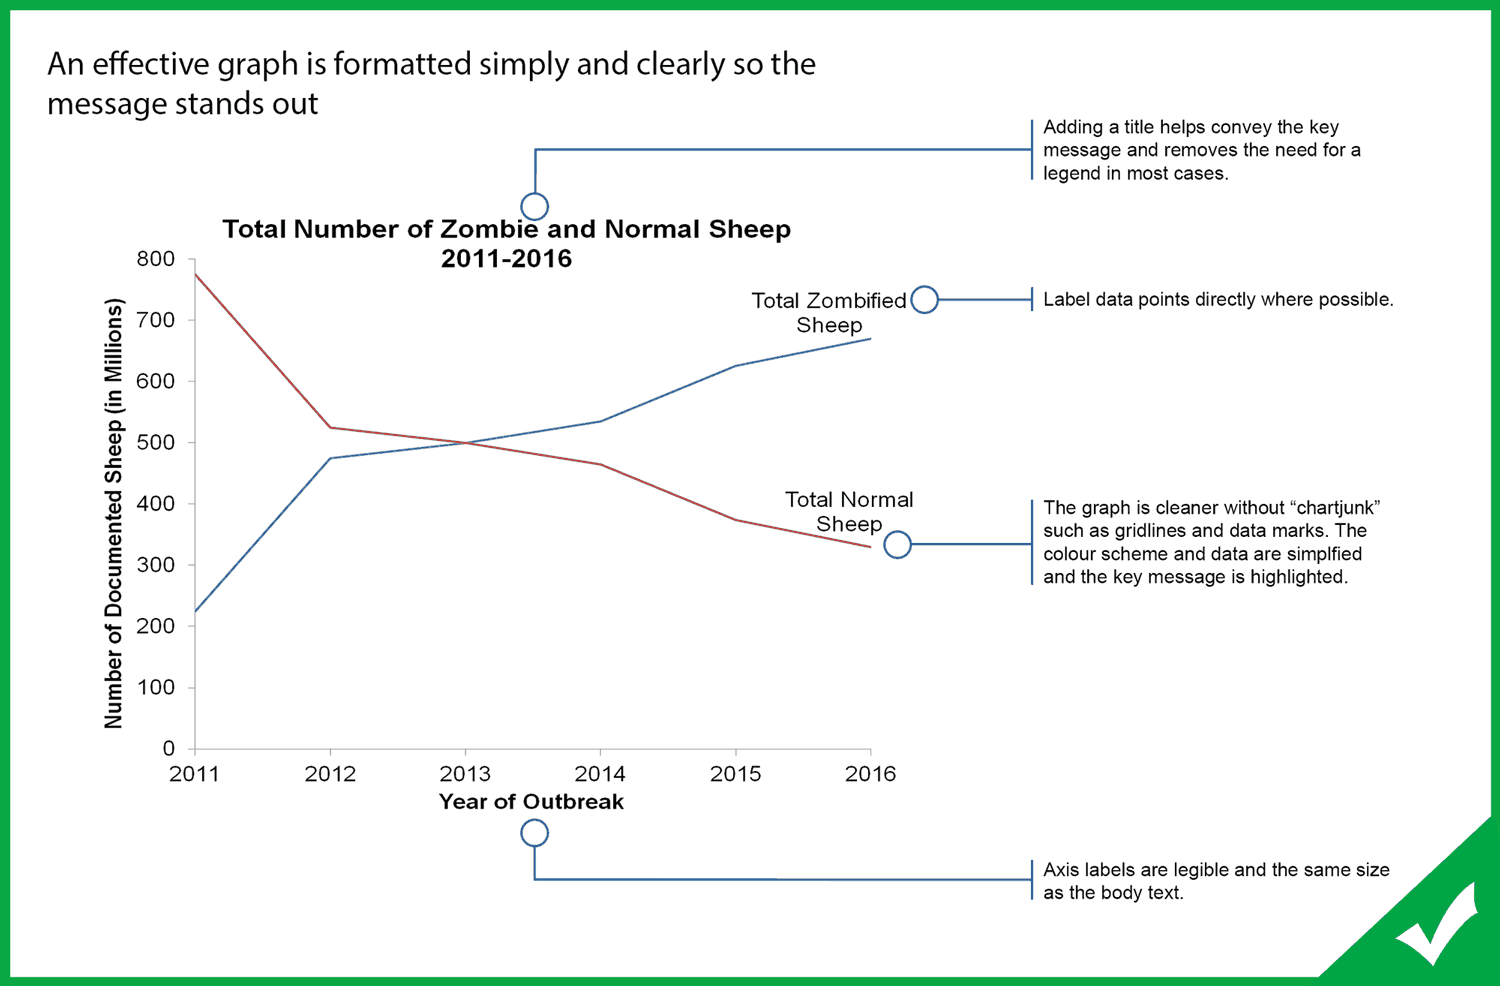

Sizing and aesthetics
Considering colour choice, white space, and alignment on your poster will help ensure you are attracting and holding your audience’s attention. In other words, this is the stage where you review your poster draft and make sure it looks good!
You will need to exercise some individual judgement here, as every poster is different and the overall aesthetic will change depending on your content and graphics. A poster with well-written content won’t be noticed if it is aesthetically bland, but use caution – particularly with colour – or your audience will either find your poster hard to read or be distracted from your key message.
The image below highlights some important considerations for poster aesthetics and sizing.